Courses


Tuesday, December 20, 2011

Flood Season Safety Tips

This post will share a few tips to staying safe during flood season in most of East Coast of Malaysian Peninsular and certain areas. Latest information I received (at 10 am) there were 1,718 victims has been moved to 28 flood evacuation centres in Johor (Portal Banjir Majlis Keselamatan Negara Johor). Here are some safety tips to prepare for rising water and what to do once a flood has begun.

Before a Flood
  • Avoid building in a floodplain.
  • Construct barriers (levees, beams, floodwalls) to stop floodwater from entering your home.
  • Seal walls in basements with waterproofing compounds to avoid seepage.
  • If a flood is likely in your area, listen to the radio or television for information.
  • Know the difference between a flood watch and a flood warning. A watch means flooding is possible. A warning meansflooding is occurring or will occur soon.

When a Flood is Imminent
  • Be prepared! Pack a bag with important items in case you need to evacuate. Don't forget to include needed medications.
  • If advised to evacuate your home, do so immediately.
  • If there is any possibility of a flash flood, move immediately to higher ground.
  • If possible, bring in outdoor furniture and move essential items to an upper floor.
  • Turn off utilities at the main switches or valves if instructed to do so. Disconnect electrical appliances.

During a Flood
  • Do not walk through moving water. As little as 6 inches (15 centimeters) of moving water can make you fall.
  • If you have to walk in water, wherever possible, walk where the water is not moving. Use a stick to check the firmness of the ground in front of you.
  • Do not drive into flooded areas. If floodwaters rise around your car, abandon the car and move to higher ground if you can do so safely.
  • Do not touch electrical equipment if you are wet or standing in water.

After a Flood
  • Listen for news reports to learn whether the community's water supply is safe to drink.
  • Avoid floodwaters; water may be contaminated by oil, gasoline, or raw sewage. Water may also be electrically charged from underground or downed power lines.
  • Avoid moving water.
  • Be aware of areas where floodwaters have receded. Roads may have weakened and could collapse under the weight of a car.
  • Stay away from downed power lines, and report them to the power company.
  • Return home only when authorities indicate it is safe.
  • Stay out of any building if it is surrounded by floodwaters.
  • Service damaged septic tanks, cesspools, pits, and leaching systems as soon as possible. Damaged sewage systems are serious health hazards.
  • Clean and disinfect everything that got wet. Mud left from floodwater can contain sewage and chemicals.

Adapted from main article: U.S. Federal Emergency Management Agency

Wednesday, December 14, 2011

Survivalism Definition


Lately my interest is to read something that over achieved by my societies who're live happily, with extra comfort and 'play save' minded. One of my topic I always hitting my keyboard via search engine is about survivalism and preppers. Who're this community? What are their mission? How to be part of 'them'?

Survivalism is a movement of individuals or groups (called survivalists) who are actively preparing for future possible disruptions in local, regional, national, or international social or political order. Survivalists often prepare for this anticipated disruption by having emergency medical training, stockpiling food and water, preparing for self-defense and self-sufficiency, and/or building structures that will help them to survive or "disappear" (e.g., a survival retreat or underground shelter). Anticipated disruptions include

  • Natural disaster clusters, and patterns of apocalyptic planetary crises or Earth changes, such as tornadoes, hurricanes, earthquakes, blizzards, and severe thunderstorms.
  • A disaster brought about by the activities of mankind: chemical spills, release of radioactive materials, nuclear or conventional war, or an oppressive government.
  • General collapse of society, resulting from the unavailability of electricity, fuel, food, and water.
  • Monetary disruption or economic collapse, stemming from monetary manipulation, hyperinflation, deflation, and/or worldwide economic depression.
  • A sudden pandemic spreading through the global population.
  • Widespread chaos, or some other unexplained apocalyptic event.


Many books have been published in the past few years offering survival advice for various potential disasters, ranging from an energy shortage and crash to nuclearor biological terrorism. In addition to reading the 1970s-era books on survivalism, blogs and Internet forums are popular ways of disseminating survivalism information. Online survival websites and blogs discuss survival vehicles, survival retreats and emerging threats, and list survivalist groups.

Economic troubles emerging from the credit collapse triggered by the 2007 US subprime mortgage lending fiasco and global grain shortages have prompted a wider cross-section of the populace to get prepared. James Wesley Rawles, the editor of SurvivalBlog and author of the survivalist novel Patriots: A Novel of Survival in the Coming Collapse was quoted by the New York Times in April 2008 as saying that "interest in the survivalist movement 'is experiencing its largest growth since the late 1970s'”. In 2009, he was also quoted by the Associated Press as stating: "There's so many people who are concerned about the economy that there's a huge interest in preparedness, and it pretty much crosses all lines, social, economic, political and religious. There's a steep learning curve going on right now.

The advent of H1N1 Swine Flu in 2009 ratcheted up interest in survivalism even further, and significantly boosted sales of preparedness books, and made survivalism more mainstream.

Read main source here


The right to make a copy for personal use is part of most existing publishing agreements. This right is recognised as an important right for the author. Because the right is attached to the author and in most cases well defined, personal use won’t harm the publisher.

Tuesday, December 6, 2011

Preparing for World Economy Depression

As we know many of my post often related to outdoor skills such as navigation, survival, basic first aid etc. This post I share with the readers to express my concern about world economy depression. Many economist said now days, US Dollar will collapse if the world doesn't recognize or trust that stamped paper with notes on that.

The US dollar is a fiat currency and this allows the Fed to print an unlimited amount. By definition the US Dollar is worthless. Investopia defines fiat currency as "currency that a government has declared to be legal tender, despite the fact that it has no intrinsic value and is not backed by reserves. Historically, most currencies were based on physical commodities such as gold or silver, but fiat money is based solely on faith." EVERY FIAT CURRENCY IN THE HISTORY OF THE WORLD HAS FAILED!

So as my initiative, I found one 'not too heavy' article to read about this issues. So seat back and read.

The thought of world economy collapse is scary, but as markets plummet, unemployment skyrockets, and experienced analysts make dire economic predictions, world economy collapse seems increasingly likely. Some forecasters are predicting that America might become the first 'undeveloped' country in the world. Whether you believe this is sensationalistic or not, what's certain is that the implosion of world financial markets continues, and we'd all do well to prepare for world economic collapse.

Only buy what you need. Don't spend a cent more than what you must, and be frugal in what you buy. Buy used whenever possible, and go for quality over quantity. Save, re-use, and do without when you have to. Remember all those stories about your grandfather walking 10 kilometers daily barefoot in the jungle or bush? We need to do the economic equivalent. Get some mettle and use the wisdom of our elders to learn to be frugal and spend wisely.

Get out of debit and start saving money. The dollar is sure to plummet even more in the face of world economy collapse, and evidence shows that gold prices rise when the dollar decreases in value. Investing in gold may be the way to go rather than cash savings. Gold coin investing can help you preserve the value of your money if the dollar sharply plummets. Gold retains its value, and can be traded for stronger currencies or used to purchase good and services. If there is no extra money to pay down debt or start saving, focus on necessities like housing, food, and supplies.

Be creative about sources of income. As more large corporations go under and thousands of jobs are lost, think outside the box for ways to bring in additional income. Examples of ways to earn extra money include direct sales, online writing for upfront or residual pay, selling high-demand items online, and selling items on consignment.

Consider a career switch, and get the necessary training while you can. Jobs in health care and energy conservation are expected to thrive even with global economic collapse.

Stockpile food, water, and emergency supplies. Dry goods like grains and legumes, along with canned goods, bottled water, water purification tablets, and first aid supplies should be kept on hand in case of emergency.

Learn to be resourceful and do things yourself. From home plumbing to growing your own food, learn to provide for your own needs as much as possible. Start now to learn how to create and tend a food garden, and consider spending time studying up on home repair and other useful skills.

Network with friends, family, and neighbors. Build relationships within the local community so that you can rely on them - and they on you - in case of world economy collapse.

Learn to barter. Have on hand important goods like personal care items (soaps, razors, deodorant), non-perishable food items, tools, first aid supplies, and other necessary supplies. Consider what you know. Do you know how to garden? Are you skilled in holistic health techniques? Do you know a lot about home repair? These skills are not only valuable for you, but you can use them to barter and help others in case of world economic collapse."


adapted from main source: click here

The right to make a copy for personal use is part of most existing publishing agreements. This right is recognised as an important right for the author. Because the right is attached to the author and in most cases well defined, personal use won’t harm the publisher.

Thursday, November 10, 2011

Latitude and Longitude for Beginner Navigators


Today I received a message from my ex-student asked about latitude & longitude for his additional knowledge. He don't have any idea about that term. So I love to share what ever I can provide, so I spent my time to did some reading & writing what ever I can put in this post.

Basically, latitude and longitude are angles that uniquely define points on a sphere. Together, the angles comprise a coordinate scheme that can locate or identify geographic positions on the surfaces of planets such as the earth.

Latitude is defined with respect to an equatorial reference plane. This plane passes through the center C of the sphere, and also contains the great circle representing the equator. The latitude of a point P on the surface is defined as the angle that a straight line, passing through both P and C , subtends with respect to the equatorial plane. If P is above the reference plane, the latitude is positive (or northerly); if P is below the reference plane, the latitude is negative (or southerly). Latitude angles can range up to +90 degrees (or 90 degrees north), and down to -90 degrees (or 90 degrees south). Latitudes of +90 and -90 degrees correspond to the north and south geographic poles on the earth, respectively.


Longitude is defined in terms of meridians, which are half-circles running from pole to pole. A reference meridian, called the prime meridian , is selected, and this forms the reference by which longitudes are defined. On the earth, the prime meridian passes through Greenwich, England; for this reason it is also called the Greenwich meridian . The longitude of a point P on the surface is defined as the angle that the plane containing the meridian passing through P subtends with respect to the plane containing the prime meridian. If P is to the east of the prime meridian, the longitude is positive; if P is to the west of the prime meridian, the longitude is negative. Longitude angles can range up to +180 degrees (180 degrees east), and down to -180 degrees (180 degrees west). The +180 and -180 degree longitude meridians coincide directly opposite the prime meridian. Latitude and longitude coordinates on the earth are sometimes extended into space to form a set of celestial coordinates.

It is okay if keep asking others person if we are don't knowing well certain information in certain area. May the person willing to show you the way via many medium that are suitable best.


The right to make a copy for personal use is part of most existing publishing agreements. This right is recognised as an important right for the author. Because the right is attached to the author and in most cases well defined, personal use won’t harm the publisher.

Sunday, November 6, 2011

Purifying the Water

Water is the main elements when you are in a survival mode. Human can stand for more than three days without any water intake. Beyond that timeline, surely the cells & the brain can't working at the normal condition. So that water is life!

In a fallout-contaminated area, available water sources may be contaminated. If you wait at
least 48 hours before drinking any water to allow for radioactive decay to take place and
select the safest possible water source, you will greatly reduce the danger of ingesting
harmful amounts of radioactivity.

Although many factors (wind direction, rainfall, sediment) will influence your choice in
selecting water sources, consider the following guidelines.

Water Sources
Water from springs, wells, or other underground sources that undergo natural filtration will
be your safest source. Any water found in the pipes or containers of abandoned houses or
stores will also be free from radioactive particles. This water will be safe to drink, although
you will have to take precautions against bacteria in the water.
Snow taken from 15 or more centimeters below the surface during the fallout is also a safe
source of water.

Rivers and Streams
Water from streams and rivers will be relatively free from fallout within several days after
the last nuclear explosion because of dilution. If at all possible, filter such water before
drinking to get rid of radioactive particles. The best filtration method is to dig sediment
holes or seepage basins along the side of a water source. The water will seep laterally into
the hole through the intervening soil that acts as a filtering agent and removes the
contaminated fallout particles that settled on the original body of water. This method can
remove up to 99 percent of the radioactivity in water. You must cover the hole in some way
in order to prevent further contamination. See figure below for an example of a water filter.


Still Water
Water from lakes, pools, ponds, and other standing sources is likely to be heavily
contaminated, though most of the heavier, long-lived radioactive isotopes will settle to the
bottom. Use the settling technique to purify this water. First, fill a bucket or other deep
container three-fourths full with contaminated water. Then take dirt from a depth of 10 or
more centimeters below the ground surface and stir it into the water. Use about 2.5
centimeters of dirt for every 10 centimeters of water. Stir the water until you see most dirt
particles suspended in the water. Let the mixture settle for at least 6 hours. The settling dirt
particles will carry most of the suspended fallout particles to the bottom and cover them.
You can then dip out the clear water. Purify this water using a filtration device.

Precautions
As an additional precaution against disease, treat all water with water purification tablets
from your survival kit or boil it.

The right to make a copy for personal use is part of most existing publishing agreements. This right is recognised as an important right for the author. Because the right is attached to the author and in most cases well defined, personal use won’t harm the publisher.


Monday, October 17, 2011

SUUNTO Orienteering Technical Course


Course: SUUNTO Orienteering Technical Course
Date: 8-9 Oct 2011
Location: Gua Tempurung, Gopeng, Perak, Malaysia

First time I know the information for this course, already make me feel interested to be a participants. I enrolled at the last minute and thanks to the organizer, because he was accepted me.

I rode my bikes to the course location took me around 6 hours journey plus a rest stops. This time really enjoyed the ride because I have never rode my bike beyond Rawang exit in Selangor. This time was my first ride in Perak.

The course really informative either you were first timer (without basic) or you already familiar with compass, map & trail running! This course conducted by Magnet Edge with collaboration with SNR Adventures, these companies were no stranger in organizing such orienteering races & rogaining races in Malaysia. They also a part of technical team for a few local adventure races.


The participants exposed to the technical knowledge & the instructor shared their experience in equipped the technical team pre, during and post orienteering race organized. The basic knowledge seems help most of us to mastered, because this course taught us to be orienteering race organizer.

As the final part of this course, all eight participants divided by two teams and need to set the orienteering course for each other at Gua Tempurung parameter. My team manage to set the 'real' orienteering course which need to walk-run for around 5km to completed the course.


The greatest part was, the participants & the instructors together swam the nearby river with strong current as a post course activity.

Later, I rode my bike headed down to my hometown JB..

Saturday, June 11, 2011

An Introduction to Rock Climbing

Hey guy, I love to share a basic knowledge for those who're interested in climbing as their recreational activities. Most of our youth surely interested and want to trying this activities with their friends. But there were little input or knowledge they have and limited 'keywords' they know to help them to search an information in the website. Perhaps this little info can enhance our youth willing to explore more inside climbing world.

First of all, I love to make sure my climbers able to pronounce properly the 'climb' word. Pronounce 'climb' word is without B at the end. Pronouncing word 'climbing' is sound as 'climing' without B. So after can perfectly pronounce the 'climb' word, I'm pretty sure most of us can easily follow the instruction in my climbing class.

Rock climbing is a sport in which participants climb up or across natural rock formations or artificial rock walls. The goal is to reach the summit of a formation or the endpoint of a pre-defined route without falling. It is a physically and mentally demanding sport, one that often tests a climber's strength, endurance, agility and balance along with mental control. Knowledge of proper climbing techniques and usage of climbing equipment is crucial for the safe completion of routes. Dare you challenge on it??


Principle of Rock Climbing

1. DO NOT guide or attempt to teach other climbers when one is inexperience or without proper knowledge to do so as it might end up causing injuries to beginner climbers or worse, or provide inaccurate information or knowledge to other beginner climbers.

2. A responsible climbing instructor must be experienced, often carried out review on one’s skill to ensure the proper knowledge was being taught to fellow climbers and also have the no-nonsense attitude when it come to the rock climbing safety measures.

3. As a beginner rock climber, it is essential to acquire the basis skill as it is assurance to safe rock climbing. It will be advisable to fetch out money from your pocket to learn from the appropriate rock climbing classes or instructors as it is always too late to feel sorry when tragic accidents took place.

4. Be considerate while climbing as there might be someone waiting to climb the same route on the climbing wall. If realize the fact that it is too tough to continue then don’t feel shame to change to a suitable route that you are competent to climb and not change the existence route to accommodate your competency as this act not only deem as dangerous in term to others’ safety but also reveal your selfishness.

5. Climbers SHOULD NOT remove any climbing equipment from the climbing wall i.e. sling or carabiner.

6. Climbers should conserve the environment and do not litter around the climbing site as it will cause discomfort to others and most importantly, it will turn the climbing site to dumping site in future.


pictures from my Basic Wall Climbing Course (Level 1) 2010

Rock Climbing Basics

Bouldering - The most basic of climbing where climbing a route with one's own hands and feet and little more than a cushioned bouldering pad in the way of protection.


Top-roping - An anchor is set up at the summit of a route prior to the start of a climb. Rope is run through the anchor; one end attaches to the climber and the other to the belayer, who keeps the rope taut during the climb and prevents long falls. This type of climbing is widely regarded as the safest type of climbing, with the lowest chance of injury.


Lead Climbing - one person, called the "leader", will climb from the ground up with rope directly attached to his or her harness (and not through a top anchor) while the other, called the "second", "belays" the leader by feeding out enough rope to allow upward progression without undue slack


Styles of Rock Climbing

Outdoor Rock Climbing - Climbing natural rock formations with the proper climbing equipment. Climbs usually take place on sunny days when the holds are dry and provide the best grip.

Indoor Rock Climbing - Climbing artificial rock walls at indoor gym with the proper climbing equipment. It permits climbing in all types of weather and at all times of day. Used for improving climbing skills and techniques.

Bouldering - Climbing on short, low routes without the use of the safety rope that is typical of most other styles.

Ice Climbing - Climbing on icefalls, frozen waterfalls, and cliffs and rock slabs covered with ice refrozen from flows of water with the ice-climbing equipment such as ice climbing axe, crampon etc.


Basic Safety Requirement

NEVER walk below when there is climber climbing especially children.
NEVER climb or boulder below when climber climbing at the same route.
NEVER step on the climbing rope.
ALWAYS maintain the climbing equipment.
NEVER talk or joke with belayer when he or she is belaying a climber.
NEVER borrow climbing equipment i.e. climbing rope to others especially strangers.
SAFETY i.e. belaying must be done especially climbing above 5 metres.
MUST INFORM belayer to be aware of falling objects especially rock regardless of big or small rocks.
ESSENTIAL to INFORM other climbers be aware of falling rope when you intend to remove the rope from the climbing wall.


Rock climbing Competition

Difficulty - competitors climb the same route(s) one after the other. Climbers must climb the route on-sight, they are not allowed to see other climbers on the route. Also, they given limited of time to visually inspect the route from ground level. The winner is the one who reaches the highest point on the climb; if several competitors reach the top (or the same high point) the time taken may be used to determine the winner.

Speed - On two identical routes, competitors race each other to the top. The first to reach the top wins the competition.

Bouldering
- Competitors work through a series of boulder problems on either a time limit or an attempt limit for each problem. Points are awarded for completing each problem. In a tie-break situation or where limited attempts are allowed then points are awarded for the fewest number of attempts required completing the problem.


The right to make a copy for personal use is part of most existing publishing agreements. This right is recognised as an important right for the author. Because the right is attached to the author and in most cases well defined, personal use won’t harm the publisher.

Monday, April 18, 2011

Survival Basic Skills


the moments of truth..
the Batik Tribe in Malaysia Kuala Tahan National Park show us their ability to make a fire with a bamboo & dried bamboo's leaves

Acquiring survival skills is an ongoing process that will last for your entire life. There is always more to learn and experience, which is part of the fun of being a survivor.

As your survival expertise grows the knowledge and abilities you gain are often useful in other areas. For example survivors prepare ahead of time, and they are experts in the art of ingenuity and inventiveness. Excellent attributes for anyone.

The possible environments and situations you could find yourself in are innumerable. Although each situation has its particular requirements for successfully surviving, in the final analysis it is mastery of five basic survival skills that are essential. Proficiency and preparedness in these 5 basic skills will give you the edge and put you on your way toward becoming a talented survivor.


First Basic Survival Skill – Fire

Knowing how to build a fire is the best survival skill you can have. Fire provides warmth, light, and comfort so you get on with the business of survival. Even if you do not have adequate clothing a good fire can allow you to survive in the coldest of environments.

Fire keeps away the creatures that go bump in the night and so you can have the peace of mind and rest you need. And that is not all. Fire will cook your food and purify your water, both excellent attributes when you want to stay healthy when potential disease causing organisms are lurking about. Fire will dry your clothing and even aid in the making of tools and keeping pesky insects at bay.

But even that is not all. Fire and smoke can be used for signaling very long distances.

Always have at least two, and preferably three, ways of making a fire at you immediate disposal. With waterproof matches, a butane lighter, and a magnesium fire starter or firesteel you should be able to create a fire anytime anywhere no matter how adverse the condtions.

So the lesson here is to learn the art of fire craft. Practice and become an expert. Your ability to create a fire is perhaps the most visible mark of an experienced survivor.

Second Basic Survival Skill – Shelter

Shelter protects your body from the outside elements. This includes heat, cold, rain, snow, the sun, and wind. It also protects you from insects and other creatures that seek to do you harm.

The survival expert has several layers of shelter to think about. The first layer of shelter is the clothing you choose to wear. Your clothing is of vital importance and must be wisely chosen according to the environment you are likely to find yourself in. Be sure to dress in layers in order to maximize your ability to adapt to changing conditions.

The next layer of shelter is the one you may have to build yourself, a lean-to or debris hut perhaps. This is only limited by your inventiveness and ingenuity. If the situation requires, your shelter can be insulated with whatever is at hand for the purpose. Being prepared, you may have a space blanket or tarp with you, in which case creating a shelter should be relatively easy.

Before you are in need of making a survival shelter, be sure to practice and experiment with a variety of materials and survival scenarios on a regular basis. Should the need arise you will be glad you did.

Third Basic Survival Skill – Signaling

Signaling allows you to make contact with people who can rescue you without having to be in actual physical contact with them. There are a variety of ways to signal for help. These include using fire and smoke, flashlights, bright colored clothing and other markers, reflective mirrors, whistles, and Personal Locator Beacons. Three of anything is considered a signal for help: 3 gunshots, 3 blows on a whistle, three sticks in the shape of a triangle.

In a pinch, your ingenuity in devising a way to signal potential help could very well save your life.

Fourth Basic Survival Skill – Food and Water

Whenever you plan an excursion be sure to always bring extra food and water. Having more on hand than you think you need will give you that extra measure of safety should something happened and you have to stay out longer than anticipated.

It is important that you know how to ration your water and food as well as find more in the environment in which you find yourself. You can go without food for a number of days, but living without water for even a few days will cause your efficiency to drop dramatically.

If at all possible, boil any water you find in order to kill disease organisms that may be in even the cleanest looking water. Filtering or chemically treating water is second best.

Fifth Basic Survival Skill – First Aid

Always bring along your first aid kit and a space blanket. Most injuries you are likely to encounter in the wilderness are relatively minor scrapes, cuts, bruises, and burns. Larger injuries are going to need better facilities than that which you have at your disposal, which means you will need outside help.

Panic is your number one enemy when you are in any emergency situation, be it injured, lost, or stranded. What you need in these situations is first aid for the mind.

Think STOP:
Sit
Think
Observe
Plan

Your best defense in any emergency is your ability to think and make correct decisions. Building a fire is often the beginning first aid for the mind. Doing so will keep you busy and provide an uplift from the warmth, light and protection fire provides.

Practice Survival Skills

The expert survival skills and know-how you have accumulated through practice and experience will serve you well. When the real thing comes along, you will be prepared and adept at staying alive. Where others have perished, as a survivor you will know you can make it. And that is a good feeling to be sure.


The right to make a copy for personal use is part of most existing publishing agreements. This right is recognised as an important right for the author. Because the right is attached to the author and in most cases well defined, personal use won’t harm the publisher.

Saturday, March 12, 2011

Basic First Aid


How to assess the needs of someone who has been injured or is in physiological distress

Basic first aid allows you to quickly determine a person’s physical condition and the correct course of treatment, whether the distress is due to to choking, heart attack, allergic reactions, drugs or alchohol or other medical emergencies. You should always seek professional medical help as soon as you are able. The following correct first aid procedures can be the difference between life and death:

1. Evaluate the situation.
Are there things that may put you at risk of harm? Are you or the victim threatened by fire, tosic smoke or gasses, an unstable building, live electrical wires and other dangers? Do not rush into a situation where you could end up as a victim yourself.
- If approaching the victim will endanger your life, seek professional help immediately; they have higher levels of training and know how to handle these situalions.

2. Remember the A,B,Cs of first aid which refer to the three critical things you need to look for.
- Airway - Does the person have as unobstructed airway?
- Breathing - Is the person breathing?
- Circulation - Does the person show a pulse at major pulse points (wrist, carotid artery, groin)?

3. Avoid moving the victim.
Avoid moving the victim unless they are in immediate danger. Moving a victim will often make injuries worse, especially in the case of spinal cord injuries.

4. Call Emergency Services.
Call for help or tell someone else (a specific person, if possible) to call for help as none as possible. If you are the only person on the scene, try to establish breathing before calling for help, and do sot leave the victim alone for an extensive amount of time.

5. Determine responsiveness.
If a person is unconscious, try to rouse them by gently shaking and speaking to them.


6. If the person remains unresponsive, carefully roll them onto their back and open his airway.
- Keep head and neck aligned.
- Carefully roll them onto their back while holding his head.
- Open the airway by lifting the chin.

7. Look, listen and feel for signs of breathing.
Look for the victim’s chest to rise and fall, listen for sounds of breathing (place your ear near the nose and mouth, and feel for breath on your cheek
- If the victim is not breathing, see the section below.
- If the victim is breathing, but unconscious, roll them onto their side, keeping the head and neck aligned with the body. This will help drain the mouth and prevent the tongue or vomit from blocking the airway.

8. Check the victim’s circulation.
Look at the victim's colour and check their pulse (the carotid artery is a good option; it is located on either side of the neck below the jawbone). If the victim does not haves pulse, start CPR.

9. Treat bleeding, shock, and other problems as needed
After you have established that the victim is breathing and has a pulse, your next priority should be to control any bleeding. Particularly in the case of trauma, you should take steps to control or prevent shock.
How to Stop Bleeding - Control of bleeding is one of the most important things you can do to save a trauma victim. Use direct pressure on a wound before trying any other method of managing bleeding.
How to Treat Shock - Shock, a loss of blood flow to the body, frequently follows physical and occasionally psychological trauma. A person - in shock will frequently have cool, clammy skin, be agitated or have an altered mental status, and have pale color to the skin around the face and lips. Untreated, shock can be fatal. Anyone who has suffered a severe injury or life-threatening situation is at risk for shock.
How to Treats Burns - Treat first and second degree burns by immersing or fleshing with cool water (no ice). Don’t use creams, butter or other ointments, and do not pop blisters. Third degree burns should be covered with a damp cloth. Remove clothing and jewelry from the burn, but do not try to remove charred clothing that is stuck to burns.
Treat a Concussion - If the victim has suffered a blow to the head, look for signs of concussion. Common symptoms are: loss of consciousness following the injury, disorientation or memory impairment, vertigo, nausea, and lethargy.
How to Treat a Spinal Injury Victim - If you suspect a spinal injury, it is especially critical that you not move the victim’s head, neck or back(Unless they are in immediate danger). You also need to take special care when performing rescue breathing or CPR.

10. Stay with the victim until help arrives.
Try to be a calming presence for the victim until assistance can arrive.

Source: News Straits Times - 1Klassifieds - Tuesday, October 26, 2010

The right to make a copy for personal use is part of most existing publishing agreements. This right is recognised as an important right for the author. Because the right is attached to the author and in most cases well defined, personal use won’t harm the publisher.

Wednesday, February 16, 2011

Basic Navigation

Navigation (pandu arah) is an essential skill that every people who are involving in outdoor recreation activity must have. Navigation can be used either with equipment (compass) or with natural sources (sun). But certain level of navigation is using a combination of equipments and the nature.

The lowest level to determine the direction is using compass (walking in the woods) and the highest level of navigation is using a scientific calculation and sophisticated equipments (landing on the moon). From the beginning, people navigate and marked their destination with many methods until a civilization happen.

Wilderness navigation can be an invaluable skill when exploring the great outdoors. The best places to explore and go hiking have no roads and lots of vegetation, making it very easy to get lost. If you’ve ever been lost in the woods for any length of time, you’ll know that it’s a very humbling and unpleasant feeling. A little preparation and practice with a few simple navigation tools can help you stay on track and avoid getting lost.

Before you set out on your next walk in the woods, take the time to learn how to read a map, use a compass, operate a GPS, and use the sun and stars to guide you. Below are some of the essential wilderness navigation skills that you can use to survive a wrong turn in the woods.

Know the Major Landmarks
Research the area that you’re going into. Most parks and campgrounds have some known boundary points. For example, the area where we go has a highway on one border and a river on another side. Knowing where I’m supposed to be in relation to these landmarks can help you get back on track. When you’re lost, you often think that you’re headed in one direction…when in fact, you’re headed in the opposite direction. Take some time before your trip to familiarize your group with a map and the area that you’ll be in.

How to Read a Map
Map reading is one of the pillars of wilderness navigation, and like any skill, it gets easier with some practice. Being able to translate the symbols, lines and colors of the map to the actual terrain features in front of you can be confusing sometimes, but it gets much easier after you try it a few times. Most maps will have a legend or key that will show you the symbols used on the map and what they represent. The colors used on maps are pretty standard and represent different types of features, as follows:

* Black: Used for man-made features and cultural areas such as buildings, roads, railways, pipelines, and property boundaries.
* Brown: Used for topographic and surface features such as contour lines.
* Green: Used to show vegetation features, such as woods.
* Blue: Used for water features, such as rivers, streams, lakes, and swamps.
* Red: Used for main roads, such as highways. It can also be used to show special features like a tunnel or survey lines.


Contour Lines
Contour lines are used to connect points of equal elevation. Being able to decipher contour lines and translate them to a picture of the terrain is a handy wilderness navigation skill. Lines that are close together indicate a steep rise in elevation. Often times, maps will label the contour lines with their elevation above sea level. Below are a few examples of what a map will show relative to the actual terrain features that they represent:


The Map’s Scale
Another key element of map reading is the scale on the map. Often overlooked, this scale can help you estimate distances and better plan the timing and route of your hike. Most maps are in a scale of 1:24,000 (standard) or 1:25,000 (metric). For the 1:24,000 scale maps, one inch equals 2,000 feet. For the 1:25,000 maps, 5 centimeters equals 1,250 meters. Look at the scale of your map and use it to your advantage. Many maps will have grid-squares to help assist in estimating distances on your map. Knowing the scale of the map and your pace length can help you get back on track...and back to camp! See the pace counting section below.


Map Care
If you need a map for your next camping trip or hike, than taking care of your map should be a top priority. If your map is not water-proof, be sure to protect it in a plastic bag or case. When you fold your map, take the time to do it properly. If you fold your map a different way each time, the creases will become worn and rip and these areas of the map will be unreadable. Depending on your trip and the type of map that you have, it may be worth your while to have it laminated. Most of the larger office supply stores can do this at a reasonable price.


Pace Counting
If you’re participating in a wilderness navigation or orienteering course, you’ll need to plot and hike through a variety of bearings and checkpoints, and you’ll also need to gauge the distance that you’re covering between each to see if you’re on track. To do this, you’ll count your paces and compare it to the projected distance that you measured on your map.

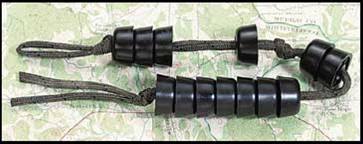
To figure out your pace count, measure a 25 meter length on a sidewalk or path, and count your paces to cover that distance. Multiply this number by 4 to get number of paces per 100 meters. Using a set of simple pace beads (like below), count your paces for the first 100 meters and then slide the first bead down. When you reach 1,000 meters, you slide down one of the top beads and reset the lower beads. It may seam archaic…but it works really well! While the use of GPS units has made land navigation a forgotten skill, it’s nice to have a back-up plan for when the batteries die!


Using a Map with a Compass
A map is necessary in wilderness navigation, but it’s not very useful without a compass to orient yourself. Once you establish the position on the map where you are (Start) and the point where you’re going to stop (Finish), the line between them is your path (azimuth). You can take your straight-edge ruler and lightly sketch this path on your map. If you have a protractor, you can also measure the compass bearing from the angle of your new line and the map’s vertical north line. If not, don’t worry – there’s another way. Place your compass on the map and turn the map until the north arrow on the map lines up with the with the north arrow on the compass (both map and compass should be on a level and flat surface). If you place your compass at the start of your path, and the north arrow on the compass lines up with the vertical grid-north lines on the map, you should be able to look down and see what direction your path is with respect to your compass bearing. Look at the bearing on the compass that lines up with the direction of your path – this is your azimuth. In the picture below, the azimuth is approximately 330 degrees.


Now that you have your azimuth, you’ll want to correct it for declination. Declination is the angle between magnetic north and geographic north. Declination varies by geographic region and usually noted on topographic maps. As an example, the northeastern states of the US have a declination correction of 10-18 degrees, but the states along the Mississippi River have a declination near zero. To correct for declination you rotate the compass on your map to re-orient the north arrow with magnetic north. Many maps will show the magnetic north arrow and geographic north arrows together with the angle defined between them.

When you start your hike, take your compass and orient yourself and the map so that your facing your azimuth (direction of your path). If there’s no visible trail to follow, you’ll want to use your compass to get a landmark to walk towards, at which point you’ll take another bearing to the next landmark. Wilderness navigation can get tricky in thick vegetation or at night and will require patience and multiple bearing checks. Before you depart, remember your back azimuth (your path minus 180 degrees), as this is the bearing you’ll want to take back to the start.

Below is an example of what the compass sight picture would look like on a lensatic compass when taking a bearing on an object:


I hope that these wilderness navigation tips help you as you prepare for your trip. It doesn’t take much time to get better at map reading and compass use. With a little bit of practice, you’ll feel a lot more comfortable before you head out into the woods!

The right to make a copy for personal use is part of most existing publishing agreements. This right is recognised as an important right for the author. Because the right is attached to the author and in most cases well defined, personal use won’t harm the publisher.

Monday, January 31, 2011

Surviving a Flash Flood


Flood in Segamat, Johor on 31 Jan 2011

Floods and flash floods are a common occurrence in my area and are an almost daily fact of life. During unusually heavy rains, flash floods will often develop suddenly and unexpectedly catching many people unaware. Flash floods alone cause hundreds of deaths each year due to drowning. Most of these deaths are caused by people driving their cars into high water areas during the flooding and could have been avoided. While most property damage cannot be easily avoided, knowing a few basic facts about floods and the effects of moving water can drastically increase your chances of survival.

Flood Survival Tips

Flood Watch: Flooding is possible in your area.

Flash Flood Watch: Flash flooding is possible in your area.

Flood Warning: A flood is occurring or will happen soon as stream or river levels rise.

Flash Flood Warning: A flash flood is occurring. Move to higher ground immediately.

  • Be alert to weather forecasts in your area during periods of excessive rainfall and know the terminology used to describe the hazard levels.
  • Be aware of your flood risk and have an evacuation route planned in advance.
  • Never cross a road or highway that has been flooded.
  • Turn off the power to avoid possible electrocution hazards.
  • Avoid contact with flood waters as they may be contaminated.
  • Avoid driving your vehicle during flood conditions
  • Abandon your vehicle immediately if it becomes flooded.
  • Don’t walk through flood waters as it is difficult to judge water currents.
  • If you are caught in flood waters, go over obstacles and keep your feet pointed downstream.
  • If you are stranded above the flood waters, stay there till rescued.


a satellite image of the movement of hurricane

flood & fire

Know that driving your vehicle during flood conditions is extremely hazardous. The saying “Turn around, don’t drown!” if followed may save your life.

Always remember these simple facts:

Six inches of water can cause you to lose control of your vehicle.

Twelve inches of water can cause your vehicle to float.

Two feet of water can sweep your vehicle completely off the road.


Staying above the water line!

Wednesday, January 26, 2011

Risk Management for Outdoor Education Activities

“Take risks: if you win, you will be happy; if you lose, you will be wise.” –Unknown-

“Man must exist in a state of balance between risk and safety. Pure risk leads to self-destruction. Pure safety leads to stagnation. In between lies survival and progress.”- Unknown-

“There is no security on this earth. Only opportunity.” - Douglas Macarthur

The Principles
  • RISK IDENTIFICATION
  • RISK ASSESSMENT
  • RISK REDUCTION
    - Avoidance
    - Reduction
    - Retention
    - Transference

Outdoor Activity Instructor Supervision

Facility & Field/Area Supervision
  • Provide for overall facility supervision,
  • including the safe arrival and departure of participants as well as a safety check of the field or facility.
  • Keep an eye on the weather and don’t play during unsafe weather conditions.
Activity Supervision
  • Recognize the hazards and potential injury
  • Always try to have a good ratio of coaches to players for every activity.
Gender-Sensitive Supervision
  • Learn how to prevent abusive situations from occurring.
  • Establish procedures to handle cases when a player is stranded after an activity.
  • Consider doing background checks on all coaches and volunteers in your organization.
Emergency Supervision
  • Train coaches and volunteers on basic emergency procedures, how to handle an injury and how to get help
  • Establish set procedures for your team and communicate them to your coaches.

Saturday, January 8, 2011

Definition, Purpose & Goals of OE

During my first class for Outdoor Education (OE) course this semester, all my students were really pleased & enthusiastic to have me as their lecturer. I shared some of the my past experiences and encourage them to start develop their unexplored potential. I was also set a few main and minor goals for them to execute and achieve by the end of this semester.

OE Definitions
  • the use of experiences in the outdoors for the education and development of the ‘whole person’ - The Outdoor Institute
  • an experiential method of learning with the use of all senses. It takes place primarily, but not exclusively, through exposure to the natural environment. - Priest, 1990
  • an international, experiential education phenomenon which engages people in adventurous activities for enhancement of the well-being of individuals, communities, and the environment - Neill, 2002

Purposes

According to Priest and Gass (1997):
  • Recreational programs aim to change the way people feel. The purpose is leisure, fun and enjoyment, e.g., surfing for pleasure.
  • Educational programs aim to change the way people feel and think. The purpose is to learn skills and/or information, e.g., learning how to surf classes or geography field trips.
  • Developmental programs aim to to change way people feel, think and behave. The purpose is is to undergo personal growth, e.g., a surfing program in which the goal was to push personal limits, test endurance, develop personal goal setting, self-discipline, and build individual's self-esteem, etc.)
  • Therapeutic / Redirectional programs aim to change the way people feel, think, behave, and resist. The purpose is correct an individual or group problem, e.g., a low security prison may conduct surfing classes and work on a beach habitat restoration program as part of a pre-release detention program for inmates)

Goals
  • Physical goals include physical fitness, weight loss, balanced dietary intake, physical movement and physical and health well-being. Physical goals may be preventative, educational, developmental, and/or rehabilitative (therapeutic).
  • Spiritual programs aim to help development of spiritual knowledge and experience (e.g., many Church and Religious groups conduct camps for young people with a combination of spiritual instruction and other goals, such as fun (recreation).
  • Relationship / Family / Group / Community oriented programs aim to change the way a particular dyad, small group or community are functioning (as opposed to individual). The unit of interest/analysis in this case is not the individual. Team productivity and school climate are examples.
  • Environmental goals include having a positive impact on a specific ecosystem (e.g., native vegetation regeneration), environmental education knowledge (e.g., local area knowledge through to awareness about global climate change), and environmental attitude.
May this post sharing can make my OE course this semester become more enjoyable and more successful.

Monday, January 3, 2011

Welcome Back!

Welcome back to campus life to my students especially the prospects who will be following Outdoor Education (SPR1832) course right here in UTM.

This semester, our class will be conducted on every Thursday 2:00pm. The mode of delivery including lecture, presentation by students and practical session. There were two main projects to be completed are Outdoor Recreation Coaching Course (Level 1) and an expedition to an island. Two other minor projects are Kayak STAR 1 course and Basic Outdoor Survival Test.


All the students must be prepare physically, mentally and financially to going through this course. Perhaps, there are a large number of student can achieve an A for this course in this semester!